

Course Editor - Editing Content
Creating modules and topics
To create a new module or topic, select the parent item from the course outline view, and right click. The context menu provides options for adding new module or topic at any level in the course.
Adding scorm package
To add an externally created scorm package, right click on course or any module or topic in the course outline, and select the scorm option from the context menu. You can also add scorm package in currently selected module or topic from the toolbar buttons. A dialog box will open which allows upload of scorm package from your machine.
Creating Lessons
To create lesson, right click on any module or topic, and select New Lesson from the context menu. Alternatively, you can also select a module or topic where you like to create the lesson, and click on New Lesson button from the toolbar. You will be presented with 4 choices of lesson types to select from, and once you select a type, next steps will allow you to add the lesson content.

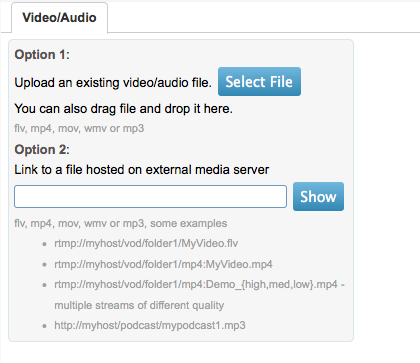
- Lessons from Existing Files - this type of lesson consists of one or more files, which you can upload. You can re-sequence the files using the Files tab in the content region. You can add a video/audio for the lesson (only 1 video/audio file per lesson) by going to the Video tab in the content region, and uploading any exising video file (FLV, MP4, MOV, WMV or MP3) or directly recording the video using any attached camera on your machine (you can change the recording quality from the camera drop down options to select larger window size). If you attach a video/audio, it would be shown in the small region in the course player. The main content region will be used to display the content of uploaded PPT/DOC/PDF file.

 File Only |
 File with Video |
 File with Audio |
- Online editied lessons - this type of lesson is edited directly inside the course editor using an online rich text editor. You can add images in the content, perform formatting of the text and insert external links. Just like the previous lesson type, you can add a video for the lesson. Note - Adding links to other lessons in the content is not supported

Embed External Content
You can also embed iFrame tag from external system to create a lesson in the editor above. Example below shows, how to embed iFrame. Make sure to open the lesson properties and turn on External Html option, otherwise lesson would get converted to SWF instead of the HTML getting displayed.

Picture below shows, how iFrame appears in the lesson when a learner view it:
- Any Existing Audio/Video - this scenraio is used when you only have Audio or Video file without any PPT/DOC/PDF content. Uploading/recording process is same as the previous type explained above, but the video/audio would appear in the main content region. If you have your video/audio file stored on external media servers (like amazon cloudfront), you can specify server specific url as well without uploading any file. Read more about remote media usage here
|
Video Only |
Audio Only |


- YouTube Video - this type of lesson consists of no text, no uploaded video... rather you just specify a URL of the video from You Tube.
Note - Enter the full video url or short url of you tube, e.g. http://www.youtube.com/watch?v=UEKjR8W2ZPo or http://youtu.be/UEKjR8W2ZPo

- Vimeo Video - this type of lesson consists of no text, no uploaded video... rather you just specify a URL of the video from Vimeo.

Import Lesson/Scorm content from any Cloud Url (Http/Https url)
To import files from any cloud url, select a module or topic where you want to import the content, and click on cloud button in the tolbar, then add the URL in the dialog box.

Import Voiced Powerpoint Presentations (PPTX only)
If you have voiced powerpoint presentations, you can import that in the course as a lesson of type uploaded file type (normal way you would upload a Powerpoint file). After the lesson is processed (converted to SWF), you would be able to preview it and all slides would be present without any audio or timing. You need to perform few additional steps to process the contained audio with each slide. Note that at present we only support WAV or MP3 audio (WMA is not supported). We now support WAV, MP3 and WMA all 3 formats typically embedded in Powerpoint files.
If you record the audio in Powerpoint 2013, its most likely a WMA format, for older versions its typically a WAV format.

You would see Split Lesson into parts button when you select the lesson created from the PPTX. Click on this button to split the PPTX lesson into individual slides.

After the split, your lesson's slide would result in several lessons to get created with single slide in each of them. But besides showing the 1 page slide, these individual parts also have linked Audio imported from the powerpoint. Open the AV tab to check the imported audio.

The original lesson would become hidden in the course (would appear with orange and striked font in the editor and would be not present in the course player). These slides would appear like this in the course player.

Related Pages
- Assessment_Getting_Started
- Managing External Candidates in Exam
- EduBrite Business Editon Intro
- Automated Membership in Groups
- SCORM
- User E-mail Settings
- Header Changes
- User Profile Customization
- Course Session Creation
- Collaboration
- course_reports_v1
- Essay_Question_Evaluation_v1
- exam_wizard_V1
- presenter_notes_V1
- Customize_Emails_V1
- assignment_creation_V1
- assignment_evaluation_V1
- assignment_submission_via_course_player_V1
- assignment_submission_V1
- shared_collections_V1
- authorize_net_V1
- user_custom_attributes_advanced_V1
- customizing_labels_V1
- multi_language_V1
- customize_Certificate_using_pdf_V1
- placement_details_ V1
- custom_certificate_V1
- signup_page_customization_V1
- css_customization_V1
- Customizing_header_footer_V1
- site_ui_customization_V1
- site_behavior_V1
- templates_V1
- facebook_linkedin_V1
- consolidate_users_V1
- email_verification_V1
- site_message_V1
- proxy_login_V1
- external_html_lesson_V1
- site_metadata_V1
- site_introduction_V1
- customize_catalog_V1
- courseUploadFormat_V1
- course_module_scheduling_V1
- aicc_V1
- iCal_integration_V1
- citrix_integration_V1
- readytalk_integration_V1
- webex_integration_V1
- automatic_free_codes_V1
- coupon_codes_V1
- paypal_direct_pay_v1
- paypal_parameters_V1
- monetization_V1
- session_notification_V1
- auto_grading_troubleshooting_V1
- course_completion_V1
- course_session_members_V1
- course_session_move_V1
- copy_course_session_V1
- course_session_configuration_V1
- import_confluence_content_V1
- course_shaing_on_social_network_V1
- custom_grading1_V1
- grading_V1
- scorm_linking_V1
- test_max_attempts_V1
- course_Session_trainee_progress_V1
- lesson_linking_V1
- sub_groups_V1
- CourseDetails_V1
- CourseAuthorization_V1
- CourseEditor-TestsProperties_V1
- CourseEditor-EditingProperties_V1
- CourseEditor-Timing_V1
- rearranging_course_items_V1
- custom_file_types_V1
- dropbox_integration_V1
- course_archiving_V1
- course_session_create_simple_V1
- preview_courses_V1
- program_learners_progress_V1
- program_certificate_V1
- program_award_V1
- program_members_manage_V1
- program_session_self_enroll_V1
- program_session_add_members_V1
- program_session_creation_V1
- create_program_V1
- Scorm_V1
- CourseEditor-GenerateTest_V1
- CourseEditor-AddTests_V1
- test_updates_V1
- CourseEditor-EditingContent_V1
- Group_Admin_V1
- import_groups_V1
- move_group_V1
- CourseEditorHelp_V1
- org_hierarchy_V1
- collaboration_V1
- group_membership_actions_V1
- inbox_V1
- group_user_management_v1
- group_management_v1
- calendar_v1
- dashboard_account_settings_v1
- online_quiz_editor_V1
- adaptive_random_questions_V1
- user_admin_V1
- Test_solutions_V1
- adaptive_testing_V1
- adaptive_section_timeout_V1
- user_deactivation_V1
- Quiz_Navigation_V1
- Quiz_Assembly_V1
- user_enrollments_V1
- Quiz_Editor_Test_Content_V1
- Quiz_Collection_V1
- quiz_objectives_V1
- Quiz_Editor_Properties_V1
- Quiz_Editor_UIOptions_V1
- Quiz_Editor_Sections_V1
- Quiz_Editor_Adaptive_Testing_V1
- adaptive_n_random_questions_each_section_v1
- adap_test_simple_branching_V1
- Quiz_Editor_Authorization_V1
- Quiz_Editor_Scoring_V1
Course Management
- User Interface
- Editing/Adding Lesson Content
- Lessons using voiced/animated powerpoint
- Emedded content (video, iframe)
- Adding Tests / Surveys (Evaluations)
- Generating Test
- Rearranging course items
- Presenter Notes
- Timing lesson / slides (syncing video)
- Course & Module Properties
- Lesson Properties
- Editing Lesson TOC
- Editing Quiz Properties
- Authorization
- Scheduling the course and adding members
- Course Details
- Importing lessons from other courses (linking lessons)
- Bulk upload of entire course, or several modules
- Share course on LinkedIn and Facebook
- Course Sharing in Multiple Sites
- Additional Downloadable Resources
- Import content from Confluence in Courses
- Import content from Dropbox
- Course Archiving
Videos

Comment