

Changing Parent of an Existing Group
Note: this action is available only for site admins
To change parent of an existing group, follow these steps
Step 1: edit the group and click on Change Parent Group.

Step 2: You will be presented with a dialog which would show all the top level groups from the microsite. Click on the arrow icons to expand the top group and view its sub-groups. Click on any group to select it as the new parent group. And click on Change to Selected Parent button. In case the group was not a top level group and you want to move it to the top level (which doesn't have any parent), click on the Move to Top Level button

Step 3: When you change the parent group, the new parent may need its members to be synced so that the parent group includes all members from the newly moved child group. After the save, you will get this message about required Group Members sync which needs to be done.
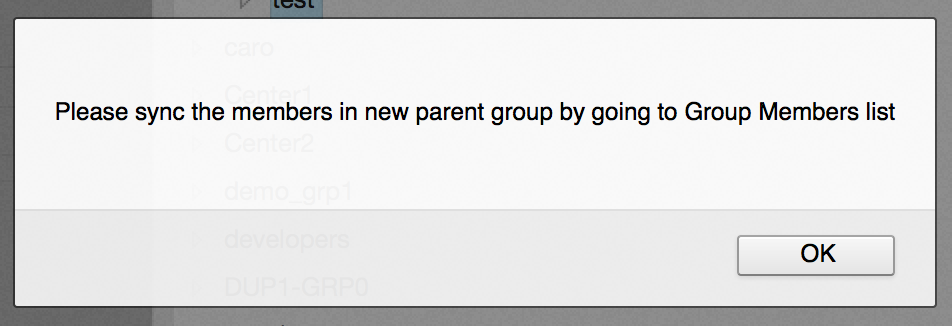
Step 4: Click on the crumb to open the parent group and go to its members tab

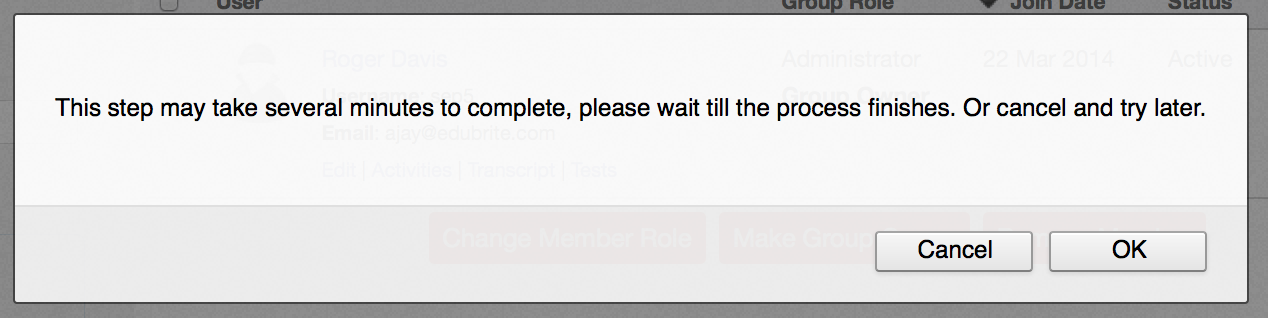
Step 5: Click on Sync button, and click OK on to confirm the sync operation. Depending on the number of users which need to be added in the new parent, the operation may take several minutes to complete.

Click OK to confirm the action.
What to expect after this:
New parent group should have all the members from the newly added child group and the Sync button should no longer be available on the parent group's members list. You would still need to make changes to older parent group to remove members from there, in case they need to be removed as a result of child group coming out of its child groups. This is not done automatically because system can't determine which members need to be removed from older parent as the member in older parent may have been present by manual addition or via other child groups.
Related Pages
- Assessment_Getting_Started
- Managing External Candidates in Exam
- EduBrite Business Editon Intro
- Automated Membership in Groups
- SCORM
- User E-mail Settings
- Header Changes
- User Profile Customization
- Course Session Creation
- Collaboration
- course_reports_v1
- Essay_Question_Evaluation_v1
- exam_wizard_V1
- presenter_notes_V1
- Customize_Emails_V1
- assignment_creation_V1
- assignment_evaluation_V1
- assignment_submission_via_course_player_V1
- assignment_submission_V1
- shared_collections_V1
- authorize_net_V1
- user_custom_attributes_advanced_V1
- customizing_labels_V1
- multi_language_V1
- customize_Certificate_using_pdf_V1
- placement_details_ V1
- custom_certificate_V1
- signup_page_customization_V1
- css_customization_V1
- Customizing_header_footer_V1
- site_ui_customization_V1
- site_behavior_V1
- templates_V1
- facebook_linkedin_V1
- consolidate_users_V1
- email_verification_V1
- site_message_V1
- proxy_login_V1
- external_html_lesson_V1
- site_metadata_V1
- site_introduction_V1
- customize_catalog_V1
- courseUploadFormat_V1
- course_module_scheduling_V1
- aicc_V1
- iCal_integration_V1
- citrix_integration_V1
- readytalk_integration_V1
- webex_integration_V1
- automatic_free_codes_V1
- coupon_codes_V1
- paypal_direct_pay_v1
- paypal_parameters_V1
- monetization_V1
- session_notification_V1
- auto_grading_troubleshooting_V1
- course_completion_V1
- course_session_members_V1
- course_session_move_V1
- copy_course_session_V1
- course_session_configuration_V1
- import_confluence_content_V1
- course_shaing_on_social_network_V1
- custom_grading1_V1
- grading_V1
- scorm_linking_V1
- test_max_attempts_V1
- course_Session_trainee_progress_V1
- lesson_linking_V1
- sub_groups_V1
- CourseDetails_V1
- CourseAuthorization_V1
- CourseEditor-TestsProperties_V1
- CourseEditor-EditingProperties_V1
- CourseEditor-Timing_V1
- rearranging_course_items_V1
- custom_file_types_V1
- dropbox_integration_V1
- course_archiving_V1
- course_session_create_simple_V1
- preview_courses_V1
- program_learners_progress_V1
- program_certificate_V1
- program_award_V1
- program_members_manage_V1
- program_session_self_enroll_V1
- program_session_add_members_V1
- program_session_creation_V1
- create_program_V1
- Scorm_V1
- CourseEditor-GenerateTest_V1
- CourseEditor-AddTests_V1
- test_updates_V1
- CourseEditor-EditingContent_V1
- Group_Admin_V1
- import_groups_V1
- move_group_V1
- CourseEditorHelp_V1
- org_hierarchy_V1
- collaboration_V1
- group_membership_actions_V1
- inbox_V1
- group_user_management_v1
- group_management_v1
- calendar_v1
- dashboard_account_settings_v1
- online_quiz_editor_V1
- adaptive_random_questions_V1
- user_admin_V1
- Test_solutions_V1
- adaptive_testing_V1
- adaptive_section_timeout_V1
- user_deactivation_V1
- Quiz_Navigation_V1
- Quiz_Assembly_V1
- user_enrollments_V1
- Quiz_Editor_Test_Content_V1
- Quiz_Collection_V1
- quiz_objectives_V1
- Quiz_Editor_Properties_V1
- Quiz_Editor_UIOptions_V1
- Quiz_Editor_Sections_V1
- Quiz_Editor_Adaptive_Testing_V1
- adaptive_n_random_questions_each_section_v1
- adap_test_simple_branching_V1
- Quiz_Editor_Authorization_V1
- Quiz_Editor_Scoring_V1

Comment