

Customizing Email Templates
In a microsite, you can customize email templates, to implement customized messages and formatting. There are two levels of customizations possible to change the formatting of emails.
1. Changing the header and footer of html text in the emails
Goto SiteAdmin->Placements and edit EMAIL_HEADER or EMAIL_FOOTER placement.

The default content for these placements is given below, which you can change. All emails will use the overridden content once you populate these placements.
Header
Header content starts the html and body tag, and opens a DIV for actual content of the email (which gets generated by specific templates, as described in step 2 below)
<html>
            <head>
                <title></title>
            </head>
            <body>
            <div style="background-color:#2B4866;font: 12px/18px 'Lucida Grande','Lucida Sans Unicode',Helvetica,Arial,Verdana,sans-serif;padding:10px">
            <div id="main" style="margin:20px; background-color:#ffffff;">
                <div id="header" style="margin-bottom:20px;height:90px;border-bottom:1px solid #AAAAAA;background:#DEF2FC;">
                    <img alt="Microsite Logo" src="__LOGO_URL__" hspace="5px" align="left"/>
                    <div id="title" style="text-align:center;font-size:20px;line-height:40px;margin-left:20px">__TITLE__</div>
                </div>
                <div id="content" style="font-size:12px;padding:5px 20px;">
Footer
Footer ends the content, body and html tags.
</div>
                <div style="border-top:1px solid #AAAAAA;margin-top:20px; text-align:center;font-size:10px">
                    <p style="font-size:8px;">Automated email generated from a customer microsite hosted on EduBrite platform.</p>
                </div>
            </div>
            </div>
        </body>
        </html>
2. Changing the Email content in templates
Edurite platform provides several email templates which you can customize to achieve customized messaging in email content. To begin with customizing email templates,
- go to Site Admin->Email Settings
- On the Email Settings page you will see several tabs, first tab captures some settings related to email at the site level. Other tabs provide ability to customize specific emails which get generated by the system. You can view each tab to see the listing of specific email, and enable or disable it. You can also override the default email template by clicking on the plus icon. Once you have overridden a template, you will start seeing the Edit icon which you can click to edit the content. The email template content follows XML coding guidelines, so be carefull while you override them. If you want to get rid of any overridden template, just rename it, while editing it.

- Once email template is published, changes will become effective (as long as they are in draft mode, they updates won't get picked up)
- You can refer to Email Variables and use them in the content of email templates
- Each template must be created as a well formed XML node, so use any external XML editor to format your code and check for well formedness
- Each template's content
- begins with a <template> element.
- It then contains an optional header element (if not present, then default header or overridden header is used). So you could override header in a specific email template as well.
- Followed by <body> element, which contains the actual content of the email. Content can have embedded variables using __VARNAME__ syntax
- Then an optional <footer> element, (if not present, then default footer or overridden footer is used)
Example template for Reset Password emails
<template type="RESETPASSWD" subject="Reset your password at __SITE__" >
            <header>
            </header>
            <body>
                <![CDATA[Hi __FNAME__,
                <p>__SITE__ received a request to reset a password associated with this e-mail address. If you didn't request this, you can safely ignore this email.<br/><br/>
                If you requested to reset your password, click on the URL below<br/>
                <a href="__URL__" target="_blank">__URL__</a>
                </p>
                <br/>
                <br/>Regards
                <br/>Support]]>
            </body>
        </template>
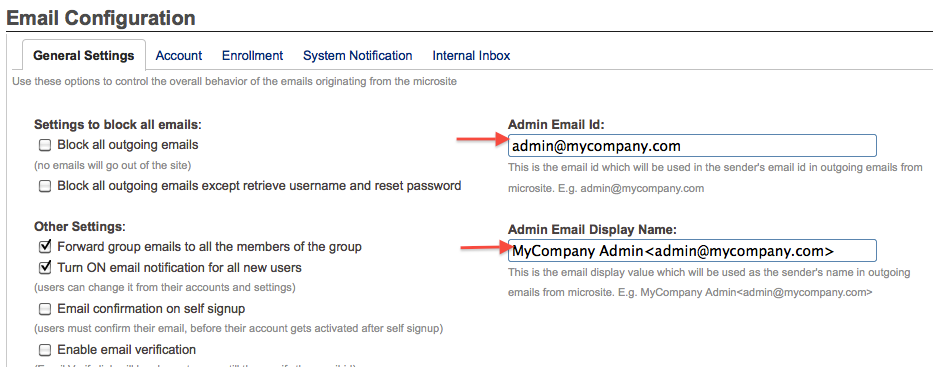
3. Customizing From email address in microsite's emails
Open the Email Settings page via Site Admin->Email Settings. On the first tab, you can specify admin email id and admin email display name which would be used as sender's name in outgoing emails from the microsite. If it is not changed, then all emails go with support@edubrite.com as the sender.
Additional Resources:
Watch Video :
- Email variables used in the template
- Scripting inside Email templates
- Email Template Scripting Example
Related Pages
- Assessment_Getting_Started
- Managing External Candidates in Exam
- EduBrite Business Editon Intro
- Automated Membership in Groups
- SCORM
- User E-mail Settings
- Header Changes
- User Profile Customization
- Course Session Creation
- Collaboration
- course_reports_v1
- Essay_Question_Evaluation_v1
- exam_wizard_V1
- presenter_notes_V1
- Customize_Emails_V1
- assignment_creation_V1
- assignment_evaluation_V1
- assignment_submission_via_course_player_V1
- assignment_submission_V1
- shared_collections_V1
- authorize_net_V1
- user_custom_attributes_advanced_V1
- customizing_labels_V1
- multi_language_V1
- customize_Certificate_using_pdf_V1
- placement_details_ V1
- custom_certificate_V1
- signup_page_customization_V1
- css_customization_V1
- Customizing_header_footer_V1
- site_ui_customization_V1
- site_behavior_V1
- templates_V1
- facebook_linkedin_V1
- consolidate_users_V1
- email_verification_V1
- site_message_V1
- proxy_login_V1
- external_html_lesson_V1
- site_metadata_V1
- site_introduction_V1
- customize_catalog_V1
- courseUploadFormat_V1
- course_module_scheduling_V1
- aicc_V1
- iCal_integration_V1
- citrix_integration_V1
- readytalk_integration_V1
- webex_integration_V1
- automatic_free_codes_V1
- coupon_codes_V1
- paypal_direct_pay_v1
- paypal_parameters_V1
- monetization_V1
- session_notification_V1
- auto_grading_troubleshooting_V1
- course_completion_V1
- course_session_members_V1
- course_session_move_V1
- copy_course_session_V1
- course_session_configuration_V1
- import_confluence_content_V1
- course_shaing_on_social_network_V1
- custom_grading1_V1
- grading_V1
- scorm_linking_V1
- test_max_attempts_V1
- course_Session_trainee_progress_V1
- lesson_linking_V1
- sub_groups_V1
- CourseDetails_V1
- CourseAuthorization_V1
- CourseEditor-TestsProperties_V1
- CourseEditor-EditingProperties_V1
- CourseEditor-Timing_V1
- rearranging_course_items_V1
- custom_file_types_V1
- dropbox_integration_V1
- course_archiving_V1
- course_session_create_simple_V1
- preview_courses_V1
- program_learners_progress_V1
- program_certificate_V1
- program_award_V1
- program_members_manage_V1
- program_session_self_enroll_V1
- program_session_add_members_V1
- program_session_creation_V1
- create_program_V1
- Scorm_V1
- CourseEditor-GenerateTest_V1
- CourseEditor-AddTests_V1
- test_updates_V1
- CourseEditor-EditingContent_V1
- Group_Admin_V1
- import_groups_V1
- move_group_V1
- CourseEditorHelp_V1
- org_hierarchy_V1
- collaboration_V1
- group_membership_actions_V1
- inbox_V1
- group_user_management_v1
- group_management_v1
- calendar_v1
- dashboard_account_settings_v1
- online_quiz_editor_V1
- adaptive_random_questions_V1
- user_admin_V1
- Test_solutions_V1
- adaptive_testing_V1
- adaptive_section_timeout_V1
- user_deactivation_V1
- Quiz_Navigation_V1
- Quiz_Assembly_V1
- user_enrollments_V1
- Quiz_Editor_Test_Content_V1
- Quiz_Collection_V1
- quiz_objectives_V1
- Quiz_Editor_Properties_V1
- Quiz_Editor_UIOptions_V1
- Quiz_Editor_Sections_V1
- Quiz_Editor_Adaptive_Testing_V1
- adaptive_n_random_questions_each_section_v1
- adap_test_simple_branching_V1
- Quiz_Editor_Authorization_V1
- Quiz_Editor_Scoring_V1

Comment