

Existing Powerpoint with Voiceover: You can directly import existing powerpoint (PPTX only) with any kind of embedded audio (MP3, WAV or WMA) and have the slides timed according to the duration of the audio. Read more about importing powerpoint here.
Note: To enable tracking of time spent on any lesson (which is not a video/audio lesson), it must have either the duration specified or its slide timing enabled. For the video/audio lessosn, time spent is always tracked.
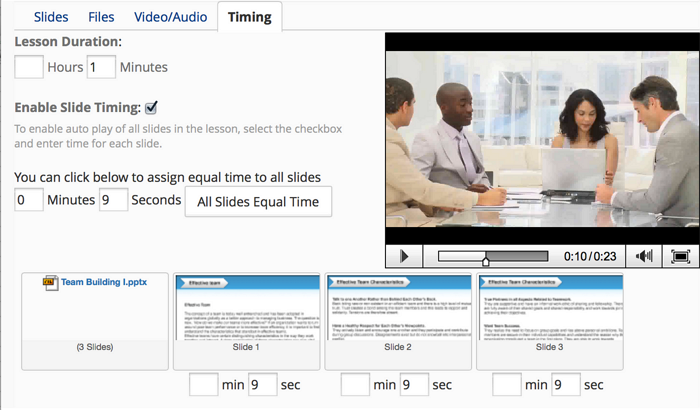
Timing the lesson
When you create a lesson using uploaded files (powerpoint, document, pdf), you can also setup the lesson to play automatically. To do this open the timing tab for any lesson and enter the number of hours / minutes which the lesson should be played for. Users will be able to come back to the lesson after the time gets over, and the specified time acts only to switch the player to next lesson while it is played.
Timing the slides
Timing can also be setup for each slide in the lesson, when you do that, the course player switches the slides automatically, after the time specified for each slide. The time for each slide can be conveniently set to divide the total lesson time equally, by clicking on the Assign Equal Time button. You can also setup equal time to all slides by entering a different value for the slide duration (by default, per slide value is calculated based on duration of lesson divided equally into number of slides in lesson). To setup unequal time, you can enter the time for specific slides.
Synchronizing the lesson presentation and Video or Audio
If your lesson contains a video or audio, you can synchronize the slide movement with the video or audio by setting up the appropriate duration for each slide. The course editor displays the attached lesson video or audio for convenience, which you can use to determine the time at any point in the video playback. Current video play time is shown in the video player's status bar.
Related Pages
all
Content Linking
Integration
Properties
Course Editor
- Video lessons with Captions and Subtitles
- Course Editor Overview
- Adding Images
- Course Ownership and Authorization
- Generating Test in Course
- Course Editor - Editing Content
- Adding Tests and Surveys (Evaluations) in Course
- Course Using Narrated and Animated PowerPoint
- Creating Lesson using Prezi
- Updating Voiced Presentation Lessons
- External Content in Lesson
- Rearranging Course Items
- Import Self Contained Html in course
Template
Other
Bulk Features
Course Management
- User Interface
- Editing/Adding Lesson Content
- Lessons using voiced/animated powerpoint
- Emedded content (video, iframe)
- Adding Tests / Surveys (Evaluations)
- Generating Test
- Rearranging course items
- Presenter Notes
- Timing lesson / slides (syncing video)
- Course & Module Properties
- Lesson Properties
- Editing Lesson TOC
- Editing Quiz Properties
- Authorization
- Scheduling the course and adding members
- Course Details
- Importing lessons from other courses (linking lessons)
- Bulk upload of entire course, or several modules
- Share course on LinkedIn and Facebook
- Course Sharing in Multiple Sites
- Additional Downloadable Resources
- Import content from Confluence in Courses
- Import content from Dropbox
- Course Archiving
Videos

Comment