

EduBrite platform allows both the creation and delivery of courses; therefore it is important to understand how things work at a high level, during and after the course creation. Courses are a collection of resources (lessons, SCORM, and quizzes) which are first authored and then delivered to trainees by creating course sessions.
High Level Workflow for Course Management
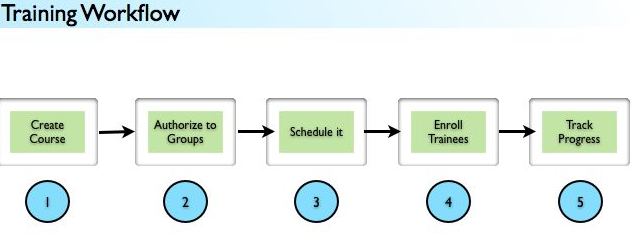
- Step1: Creating Course Structure & Content
- Modules and Topics: In the course editor, you will create modules (folders). You can create hierarchy in courses by adding topics (sub-folders) inside modules
- Lessons: You will add lessons (content items) by choosing from several types of lessons allowed in the editor. All lessons must reside within a module or topic. In general, you can upload any existing PPT, PDF, DOC, FLV, MP4 or MP3 file as the lesson content. If you created a PPT/PDF/DOC lesson then you can also add additional video/audio for it which will play along with the slides. You can also create lessons by using YouTube/Vimeo video links. Just select the appropriate type of lesson when the lesson wizard presents you with the choices.
- Quiz: One or more quizzes can be added to each module or topic. The quiz or survey has to be created beforehand, and you will be allowed to link to it in the course. The same quiz can be linked to multiple courses.
- SCORM: If you have SCORM packages, you can upload the zip file containing the SCORM package directly to the course or within any module or topic.
- Preview - You can preview the course anytime during authoring. Previewing the course will load the course content in the Course Player, which is how learners will see the course.
- Step 2: Course Authorization
- By default, the editor sets the authorization level of the created course at the Site level, which means all users of the site can view it as a resource
- But in almost all training use cases, you should change the authorization to Selected Groups, and add the desired authorized groups (your site must already have some groups created)
- Ownership: by default, the course creator also becomes the owner of the course, which prevents any other site user from editing it. You can change the ownership and make it owned by a group rather than an individual user. That way any admin or instructor belonging to that group can edit it.
- Step 3: Publish
- Publish the course once you have completed these steps. Publishing it will make the course active.
- Step 4: Schedule
- You can deliver the course by scheduling it for a period which is called a course session. Each session is targeted to a specific group. A course can be scheduled any number of times.
- Step 5: Enroll
- Once you have created a course session, you can add learners to that session. Or, change the course session's access type to Open or Paid to enable self-enrollment
Getting Familiar with the User Interface
The course editor allows the creation of courses which can have multiple lessons, SCORM packages, and quizzes organized into hierarchical folders called modules and topics. The editor consists of tabs from which to select content or property editing, a course outline, Toolbar, Statusbar, and Content region.
Top Level Tabs
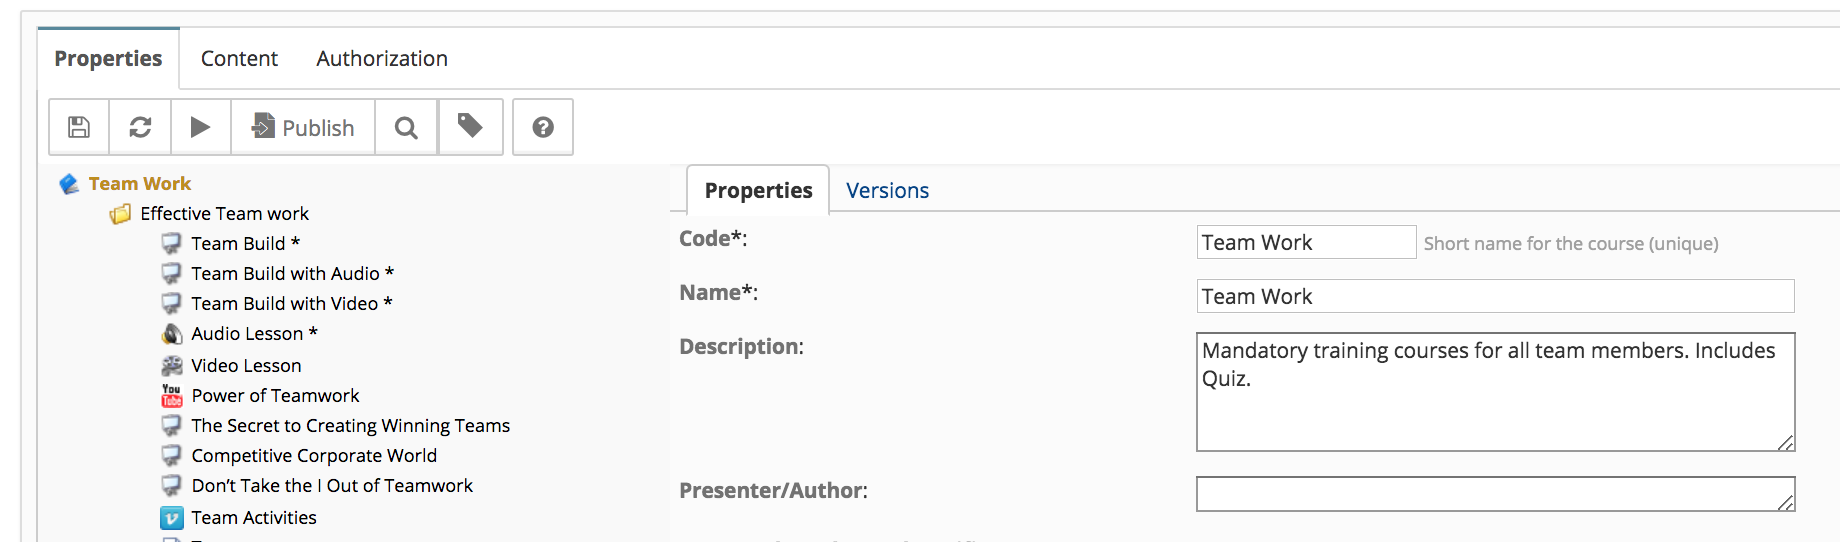
The editor consists of a Property tab and a Content tab at the top, to edit the property or content of any item in the course.
Properties Tab - this tab provides a view and editing ability for all the properties of the currently selected item. For most items, a form-like interface is shown which allows editing of values. Common properties include the duration of the item in days, hours and minutes. For lessons and tests, you can set the visibility conditions from the properties tab.
Course Properties If the course node is selected, the course properties are presented and a version tab is present that lists the course's version history.
Content Tab - this tab provides a thumbnail view of most items (except SCORM packages and videos). For online-edited lessons, it also provides a rich text editor.
Authorization Tab - this tab provides the ability to select access level, course owner, and authorized groups for the course.

Course Outline
A course outline (tree view of items) allows the selection of any item in the course for editing. The first item in the course outline is the course itself, which allows the setting of some properties which are course-specific. Different types of icons are used in the course outline to represent various types of lessons, quizzes, modules, topics, and SCORM content. You can expand and collapse an item by double-clicking the item's icon. Common actions on any item are available through the contextual menu, which can be activated by right-clicking on any item. The regular click (left click) will activate the item and the editor area will be refreshed with item-specific content.
| Icon | Item |
|---|---|
 |
Course |
 |
Module |
 |
Topic |
 |
Lesson - uploaded file |
 |
Lesson - online edited |
 |
Lesson - Recorded or uploaded video |
 |
Lesson - YouTube |
 |
Lesson - Vimeo |
 |
Lesson - Prezi |
 |
Quiz or Survey |
 |
SCORM package |
 |
LTI |
Right-click contextual menus in course outline view
The contextual menu provides different options when the item is clicked depending on its type. Clicking on the course node presents the following menu, which allows adding a new module or SCORM or AICC or LTI or renaming or deleting a course.
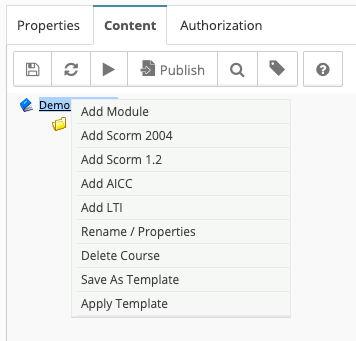
Note - Contact EduBrite support to enable LTI in your microsite.
Clicking on a module shows the following context menu, which allows the addition of a new lesson, topic, AICC, LTI, SCORM item. You can also delete a module from the contextual menu. Clicking any topic node under the module provides the same set of options.
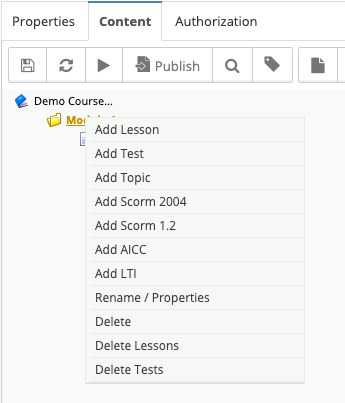
The contextual menu provides a quick way to perform actions on any item in the course, without activating the item.
Toolbar
Toolbar buttons are contextual as well and visible depending on the currently selected item in the course outline viewer. Each item type may have different actions depending on the current status of the item and course.
Actions On Course
| Icon | Action |
|---|---|
 |
Save |
 |
Refresh |
 |
Preview |
 |
Publish |
 |
Schedule the course (course session creation) |
 |
Re-edit |
 |
Metadata |
 |
New Module |
 |
New SCORM 2004 package |
 |
New SCORM 1.2 package |
 |
Upload a zip of entire course content in EduBrite supported format |
 |
Import module from another course |
 |
View revisions history |
Actions on Module and Topic
| Icon | Action |
|---|---|
 |
New Lesson |
 |
Add Test |
 |
Generate Test |
 |
Upload Multiple lessons in a module |
 |
Upload from Dropbox |
 |
New Topic |
 |
Move Up (at the same level) |
 |
Move Down (at the same level) |
|
Import module/topic content from another course (recursive linking) |
 |
Import lesson or SCORM from a HTTP URL (any cloud URL) |
Actions on Lesson
| Icon | Action |
|---|---|
 |
Upload Files (for lessons of type File), Videos (for Video lesson) in Lesson |
 |
Move Up (at the same level) |
 |
Move Down (at the same level) |
 |
Format - Heading |
 |
Format - Bold |
 |
Format - Italics |
 |
Format - Underlined |
 |
Insert Attachment (images) |
 |
Format - Ordered (numbered) List |
 |
Format - Unordered List |
 |
Format - Indent Left |
 |
Format - Indent Right |
|
Upload Video |
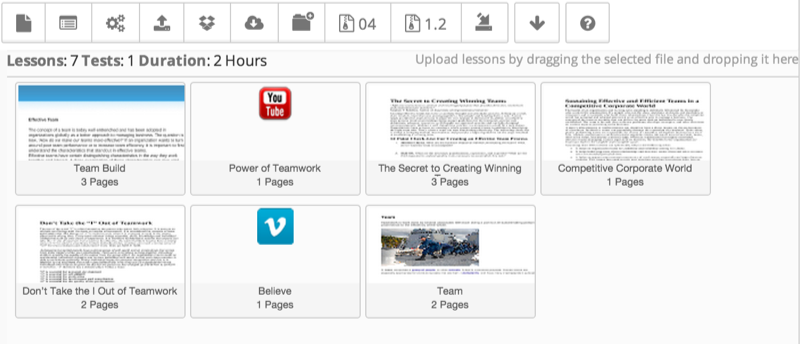
Content Region
The content region is also available depending on the selected item in the course outline, and the currently active top-level tab. You can edit the properties as well as add content in the same content region in the editor. The content region supports drag and drop of files from your computer, depending on the currently selected item and the status of the item and course. It also provides a thumbnail view of lessons and the pages inside the lessons.
Status Bar
The status bar displays additional information about the currently selected item in the course outline, status of the course and other contextual information.
Course Management
- User Interface
- Editing/Adding Lesson Content
- Lessons using voiced/animated powerpoint
- Emedded content (video, iframe)
- Adding Tests / Surveys (Evaluations)
- Generating Test
- Rearranging course items
- Presenter Notes
- Timing lesson / slides (syncing video)
- Course & Module Properties
- Lesson Properties
- Editing Lesson TOC
- Editing Quiz Properties
- Authorization
- Scheduling the course and adding members
- Course Details
- Importing lessons from other courses (linking lessons)
- Bulk upload of entire course, or several modules
- Share course on LinkedIn and Facebook
- Course Sharing in Multiple Sites
- Additional Downloadable Resources
- Import content from Confluence in Courses
- Import content from Dropbox
- Course Archiving
Videos
